Category Archives: New Stuff in Soapland

Hand Lotion Bars

HandLotionHiya Lovies!

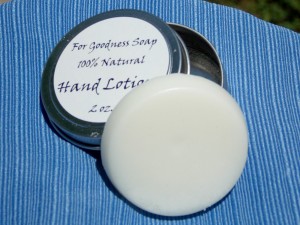
I know it’s late, but this is so great for winter skin!  Solid hand lotion bars are wonderful.  You hold one, and let your warmth melt it up a bit, and then you have the lotion to make your cracked, winter hands feel so much better!

Better yet, prevent the ugliness of cracked hands!

Here we go!

Figure your amounts for one oz. per bar.  I’m going to figure 10 bars per recipe.

5 oz shea butter
5 oz beeswax pellets (please don’t get a block…it’ll take you until June to melt it)
Melt the above gently until totally liquid.
1 Tbsp tapioca starch (or cornstarch, if you must)
10 drops fragrance or essential oil (whatever you want to smell like)

Blend the above thoroughly, melting in the microwave as necessary to get everything incorporated.  It needs to be liquid, but not scalding hot.  If it’s too hot, the starch will sink down and separate when you mold it.  So make sure everything’s well incorporated and not too hot to stay that way, then pour into your little 1 or 2 oz molds (there are tons on Amazon or WholesaleSuppliesPlus.com, if you need molds).

Some folks just let them solidify on the counter, but I put them in the freezer to prevent any separation.  In an hour or so (freezer time), they’re ready!

Enjoy!

Mixin’ It Up!

wpid-20131217_075819.jpg

They say there’s more than one way to skin a cat.

I’m not a big fan of skinless cats, and it can’t be terribly comfortable for them either, so let’s have none of that.

There’s also more than one way to make soap!  My main method is cold process.  It allows me to use my slab mold and play with design and texture on the largest surface of the soap.  It makes for very fluid swirls and all manner of yummy looks.

Peep, if you will, the following examples:


ChristmasRosemaryVanillachocolateSpiced Apple

The only down side to the cold process method is the time it takes for these beauties to be cured and ready.  After I get ’em looking like what you just peeped, I must wait 4 to 6 weeks before they’ve reached a full cure!  Since 4 to 6 weeks is not now, and I’m a big, BIG fan of now,  I’m glad to say there’s a quicker method!

Hot process soapmaking is a different way to get the same product.  The lather, the fragrance, the cleansing qualities are all the same.  The look, however, is different!  I do hot process in a log or loaf mold, which makes a big ol’ hunk o’ soap that gets sliced into bars.  With this process, I can play with the design on the INSIDE of the soap, rather than the large surface area!  Peep on:

RosyCheekHPManly Grunting Man SoapDSCN1020[1]CocoNuts 

Number one awesomeness about the hot process method is the speed.  Once it’s cut and trimmed, it can be used immediately!  I like to give it a few days to firm up a bit, but it’s completely saponified during “the cook”.  I actually cook the soap through the cure before I add the color and scent, coconut milk or oatmeal or any other fun stuff.  I can even wash my pot with what’s left in it when I’m done!

There’s an element of mystery and fun involved too, because I never REALLY know what it’s going to look like until the next day, when I unmold and slice it!

Thanks to the hot process method, I’ve been able to keep my stock going through the mad holiday rush!  I plan to make both hot and cold process soaps for all or most of my recipes from here on out, rush or no rush!

You can see all the different “versions” of each soap in the product gallery on each item’s page, and take comfort in the fact that if something sells out, it won’t be a month or more before you see it again!

I love this stuff…